Содержание
Contents
What Is Windows Boot Manager?
Windows Boot Manager (BOOTMGR) is a utility that boots operating systems. If you have several operating systems, you can enable Windows Boot Manager when the computer boots and then select the target operating system.![]()
How to Enable or Disable Windows Boot Manager in Windows 10?
Solution 1: Using Command Line to Enable or disable Windows Boot Manager
This way requires administrator privilege to perform. If you don’t have an administrator account, it’s recommended to use Renee PassNow to create it before taking the steps below.
Step 1: Type “cmd” in search box, right click the command prompt and select “Run as administrator”.![]() Step 2: Once the command prompt pops up, type in: bcdedit /set {bootmgr} displaybootmenu yes and bcdedit /set {bootmgr} timeout 30. Press “Enter” after you type each command.
Step 2: Once the command prompt pops up, type in: bcdedit /set {bootmgr} displaybootmenu yes and bcdedit /set {bootmgr} timeout 30. Press “Enter” after you type each command.
Note: Timeout determines how long the boot manager is displayed. You can specify the timeout value in seconds according to your requirement.
![]() Step 3: If you intend to disable Windows Boot Manager, please type in: bcdedit /set {bootmgr} timeout 0. Press “Enter”.
Step 3: If you intend to disable Windows Boot Manager, please type in: bcdedit /set {bootmgr} timeout 0. Press “Enter”.![]() Actually, you can also try the “bcdedit /set {bootmgr} displaybootmenu no” command line to disable Windows Boot Manager. But the disadvantage is that the following solution 2 can’t be used if you disable BOOTMGR with this command.
Actually, you can also try the “bcdedit /set {bootmgr} displaybootmenu no” command line to disable Windows Boot Manager. But the disadvantage is that the following solution 2 can’t be used if you disable BOOTMGR with this command.
Solution 2: Enable or Disable Windows Boot Manager via System Properties
Step 1: Press “Win” + “R” key to open “Run” command box.![]() Step 2: Type in: sysdm.cpl. Click “OK”.
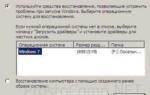
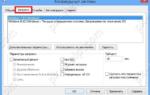
Step 2: Type in: sysdm.cpl. Click “OK”.![]() Step 3: When the “System Properties” pops up, select “Advanced” option. Then click “Settings” under “Startup and Recovery”.
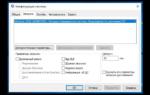
Step 3: When the “System Properties” pops up, select “Advanced” option. Then click “Settings” under “Startup and Recovery”.![]() Step 4: Next, check the box “Time to display list of operating systems” and set the time value. Click “OK”.
Step 4: Next, check the box “Time to display list of operating systems” and set the time value. Click “OK”.![]() Step 5: If you intend to disable Windows Boot Manager, just uncheck the box “Time to display list of operating systems” or set the time value to 0. Click “OK”.
Step 5: If you intend to disable Windows Boot Manager, just uncheck the box “Time to display list of operating systems” or set the time value to 0. Click “OK”.![]()
How to Add or Remove Operating System in Windows Boot Manager?
Generally, system is automatically added after installing it. Or you can add it manually with method below. Please note that this solution requires administrator privilege to perform. If you don’t have an administrator account, it’s recommended to use Renee PassNow to create it.
Here are how to add Windows XP to Windows 7/10 Boot Manager.
Step 1: Type “cmd” in search box, right click the command prompt and select “Run as administrator”.![]() Step 2: Type following commands in order. Please remember to press “Enter” after you type each command.
Step 2: Type following commands in order. Please remember to press “Enter” after you type each command.
- bcdedit /create {ntldr} /d “Windows XP”
Note: The value “Windows XP” can be replaced with another system that you want to add.
- bcdedit /set {ntldr} device partition=C:
Note: Here C: means that the system locates in C: drive. Please fill in the drive letter of the partition where you installed your Windows.
 Как изменить порядок загрузки операционных систем Windows
- bcdedit /set {ntldr} path ntldr
- bcdedit /set {ntldr} description “Windows XP”
Note: The value “Windows XP” can be replaced with another system that you want to add.
Windows XP will be added to boot manager after executing above commands successfully. Besides, if you want to have the target system ranked first in boot menu, try the “bcdedit /displayorder {ntldr} /addfirst” command.
Next, use the following solution to remove system in Windows Boot Manager if needed.
Similarly, this solution requires administrator privilege to perform. If you don’t have an administrator account, it’s suggested to use Renee Passnow to create it.
Step 1: Type “cmd” in search box, right click the command prompt and select “Run as administrator”. When the command prompt pops up, type in: bcdedit. Press “Enter”. Then find out the identifier of the system that you intend to remove.![]() Step 2: For example, you need to remove Windows XP and the identifier is{ntldr}. Then you need to type in: bcdedit /delete{ntldr}.Once the system is removed, it won’t boot. Please confirm the target system and the identifier that you need. Besides, the{current}identifier means the system you’re using.
Step 2: For example, you need to remove Windows XP and the identifier is{ntldr}. Then you need to type in: bcdedit /delete{ntldr}.Once the system is removed, it won’t boot. Please confirm the target system and the identifier that you need. Besides, the{current}identifier means the system you’re using.
How to Fix Windows Boot Manager?
If there’s something wrong with Windows Boot Manager, Windows usually can’t boot properly. And it will lead to blue screen when Windows boot.![]() There’re two parts of Windows Boot Manager.
There’re two parts of Windows Boot Manager.
1. Boot Configuration Data. It is stored at BCD file. If there’s any problem with this file, the blue screen error (0xc000000f, 0xc0000225, 0xc0000034) will occur.
2. System files. If there’s problem with the system files such as bootmgr, an error message “Bootmgr is missing” will appear.
Startup Problem
Step 1: Turn on the PC. Connect the bootable USB drive to the computer. Then change the boot order in BIOS setup and have the PC restarted from the USB drive.
Tips: Read this page for more details to create a bootable USB drive.
 Что делать, если возникла ошибка bootmgr is missing
![]() Step 2: After the PC boot from USB drive, click “Repair your computer” in the bottom-left corner.
Step 2: After the PC boot from USB drive, click “Repair your computer” in the bottom-left corner.![]() Step 3: When you enter Windows recovery environment, select “Troubleshoot”> “Advanced options”> “Command Prompt”.
Step 3: When you enter Windows recovery environment, select “Troubleshoot”> “Advanced options”> “Command Prompt”.![]() Step 4: Once “Command prompt” pops up, type these commands in order: bootrec / fixmbr, bootrec / fixboot, bootrec / rebuildbcd. Please press “Enter” after you type each command.
Step 4: Once “Command prompt” pops up, type these commands in order: bootrec / fixmbr, bootrec / fixboot, bootrec / rebuildbcd. Please press “Enter” after you type each command.![]()
System Files Lost/Corrupted
Step 1: Repeat above step 1/2. Then select “Troubleshoot”> “Advanced options”> “Command Prompt” after you enter Windows recovery environment.![]() Step 2: Once “Command prompt” pops up, type in: sfc /scannow. Press “Enter”.
Step 2: Once “Command prompt” pops up, type in: sfc /scannow. Press “Enter”.![]() The lost or corruption of System files could be caused by the missing or damaged MBR. In command prompt, type in: bootrec /fixmbr. And MBR will be fixed.
The lost or corruption of System files could be caused by the missing or damaged MBR. In command prompt, type in: bootrec /fixmbr. And MBR will be fixed.
How to Use Renee PassNow to Create Administrator Account?
Step 1: Download and install Renee PassNow in any workable Windows computer.
![]()
Step 2: Choose creation method, USB or CD/DVD.
![]()
Step 3: Boot the target PC from the created password reset USB/CD/DVD.
You will boot the target computer via a new created reset disk. Firstly, please hold a hot key to enter the BIOS menu and put CD-ROM or Removable Devices as the first choice. Please click here to know about how to change the boot order of your computer. After changing it successfully, please remember to save your setting and then restart your PC.
![]()
 Изменение параметров загрузки в Windows 7 (msconfig вместо boot.ini)
Step 4: Select “PassNow!”.
![]()
Step 5: Click “Create new account” to get a new administrator account.
The created administrator account named “Reneelab” with administrator rights, and its default password is “123456789”. You are able to change the password of target account with this new created administrator.
![]()
Relate Links :
How to Fix Blue Screen of Death in Windows 7
![]()
26-02-2019
Jennifer Thatcher : Blue screen of death (BSoD) is a very common issue for Windows 7 users. Sometimes it can be…
How to Fix Error Code 0xc0000034?
![]()
24-12-2018
Jennifer Thatcher : Many users have encountered the blue screen problem when trying to boot the PC. It’s a symptom of…

 Как отключить защиту Secure Boot в Биосе с поддержкой UEFI
 Редактирование загрузки нескольких операционных систем Windows
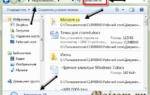 Как на компьютере распечатать текст,
изображение или другой файл
Как на компьютере распечатать текст,
изображение или другой файл Восстановление операционной системы Windows XP через программу или диск