Содержание
Автор: · Опубликовано 31.12.2017 · Обновлено 02.07.2018
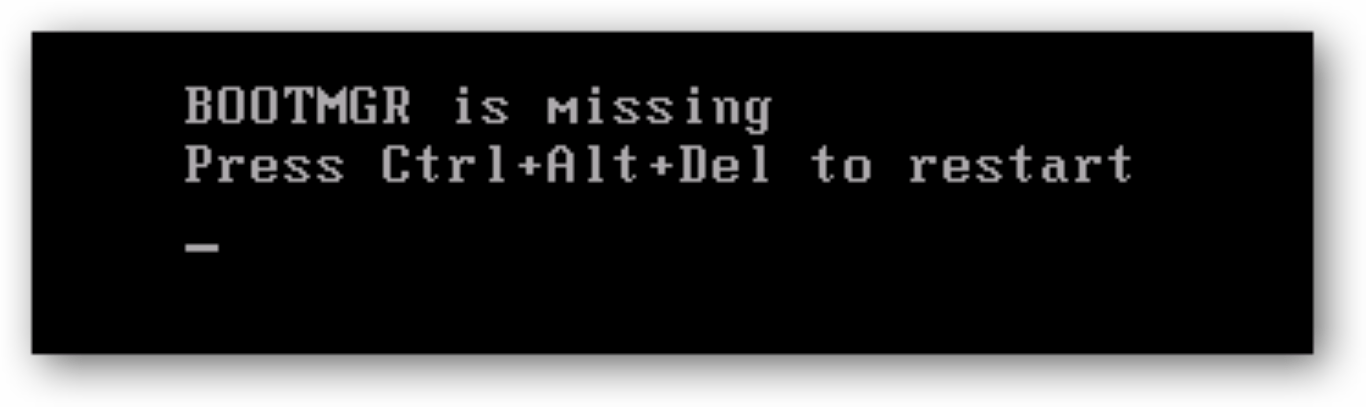
И так, продолжим. В предыдущей статье мы восстанавливали MBR загрузчик средствами BOOTREC.EXE и BOOTSECT.EXE. И если предыдущие инструкции вам не помогли или все закончилось ошибкой bootmgr is missing. Или же вы как раз начали работать именно с этой ошибкой. Милости просим к нашему шалашу!
BCDBOOT — средство, которое используется для создания системного раздела или восстановления среды загрузки, расположенной в системном разделе. Системный раздел создается посредством копирования небольшого набора файлов среды загрузки из установленного образа Windows®. Средство BCDBOOT создает хранилище данных конфигурации загрузки (BCD) в системном разделе с новой загрузочной записью, которая позволяет загружать установленный образ Windows.
Наверное не совсем понятно написал, хм. Напишу проще — это средство которое восстанавливает системные, загрузочные файлы в маленьком скрытом разделе. Который создается в самом начале установки Windows. Именно он содержит среду Windows RE, а так же файлы загрузки.
На самом деле не все так категорично, разметка дисков бывает разная и ситуации разные. Бывает что этот раздел отсутствует или поврежден. И непосредственно файл bootmgr отсутствует. Иногда сама загрузочная запись не находит этот файл по причине повреждения файловой системы раздела на котором находятся файлы загрузки. Почему-то это часто стало встречаться в Windows 10. Так что имейте ввиду… В таких случаях всегда хорошо отрабатывает простая команда CHKDSK C: /f /r
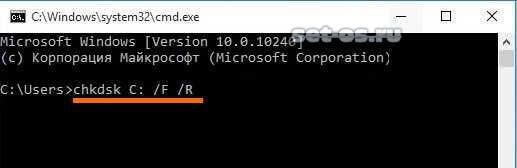
Проверяете этой командой все разделы связанные с операционной системой, либо все разделы по очереди. И вполне вероятно система запуститься.
Но если файлы загрузки остались на другом жестком диске, скажем если вы временно подключали дополнительный жесткий диск для копирования файлов. И совершенно случайно временный диск определился первым в системе на момент установки Windows. А когда отключили, система не смогла корректно запуститься. Или просто запутались в параметрах разделов и что-то пошло не так. Во всех этих случаях поможет BCDBOOT. Именно с ней мы сейчас и попробуем разобраться.
 UEFI Boot - что это такое и как отключить UEFI в БИОСе. Или просто о научном
Параметры командной строки средства BCDboot.
BCDBOOT источник [/l ] [/s ] [/v] [/m [{GUID_загрузчика_операционной системы}]]
| Параметр | Описание |
|---|---|
|
источник |
Указывает расположение каталога Windows, используемого в качестве источника при копировании файлов среды загрузки. |
| /l | Необязательный. Задает язык. По умолчанию используется английский (США). |
| /s | Необязательный. Указывает букву диска системного раздела. По умолчанию используется системный раздел, заданный микропрограммой. |
| /v | Необязательный. Включает режим подробного протоколирования. |
| /m |
Если GUID загрузчика операционной системы задан, для создания загрузочной записи объединяет объект загрузчика с шаблоном системы.
</tr></tbody></table>
Командная строка в данном случае может выглядеть таким образом:
bcdboot.exe c:windows
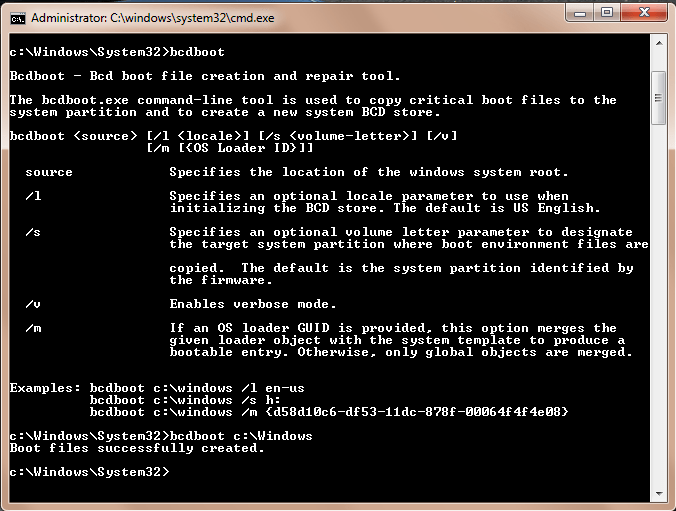
Замените c:windows на путь, соответствующий вашей системе. Эта операция восстановит поврежденную среду загрузки Windows, включая файлы хранилища конфигурации данных загрузки (BCD), в том числе упомянутый выше файл bootmgr. И выйдет сообщение «Файлы загрузки успешно созданы» либо «boot files successfully created» В зависимости от локализации среды Windows RE.
Если после ввода команды у вас выйдет ошибка «Сбой при копировании файлов загрузки»
 Как изменить порядок загрузки операционных систем Windows
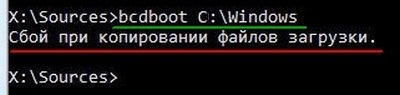
Это обозначает только одно — на жёстком диске нет ни одного активного раздела! Относится это правило к компьютерам с выключенным UEFI, то есть Windows установлена на диске MBR. Для того, чтобы утилита BCDboot восстановила загрузчик, наличие активного раздела на жёстком диске MBR обязательно.
Для работы с разделами, в системе имеется достаточно эффективный инструмент — diskpart. Это работающий в текстовом режиме командный интерпретатор в операционных системах Windows Vista/7/8/8.1/10. Средство позволяет управлять объектами (дисками, разделами или томами) с помощью сценариев или команд, вводимых из командной строки.
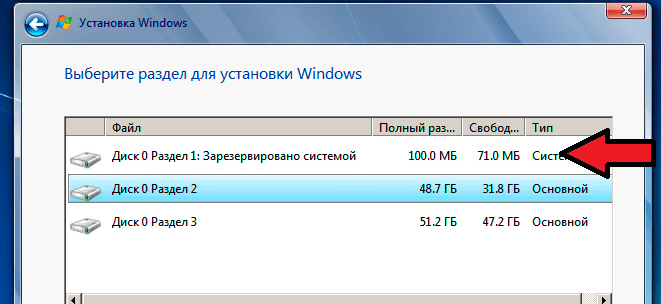
Итак, попробуем сделать системный (который «зарезервировано системой», обычно там находятся файлы загрузки) раздел активным. Для этого в командной строке среды Windows RE вводим поочередно команды:
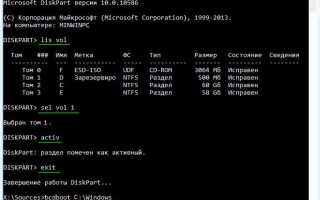
diskpartlis vol (выводим список разделов жёсткого диска и видим, что «Том 1» является скрытым разделом System Reserved (Зарезервировано системой), объём 500 Мб, на нём должны располагаться файлы загрузки Windows 10 и именно его нужно сделать активным). Также видим раздел с установленной Windows 10, у него буква С:, объём 60 Гб.sel vol 1 (выбираем Том 1)activ (делаем его активным)exit (выходим из diskpart)bcdboot C:Windows (где C: раздел с установленной Windows 10), данная команда восстанавливает файлы загрузки Windows 10 (файл bootmgr и файлы конфигурации хранилища загрузки (BCD))!«Файлы загрузки успешно созданы» 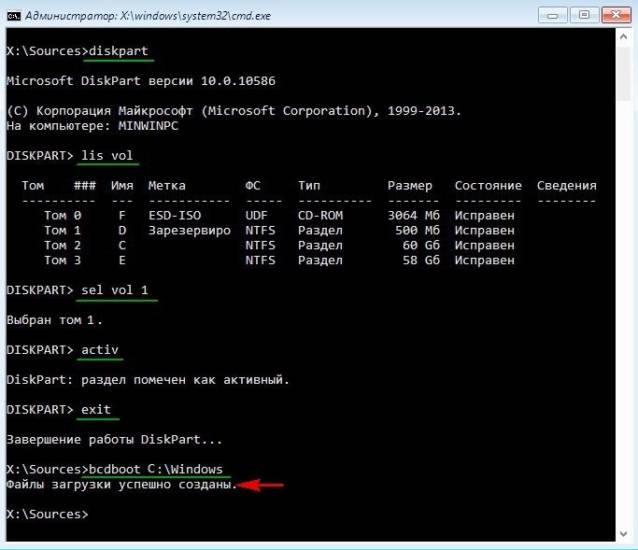 Подробнее о программе diskpart можно прочитать здесь.Буквы дисков и конфигурация разделов может отличаться, важно понять принцип. Основное — загрузочная запись и наличие активного раздела с системными файлами загрузки.У меня бывали ситуации при которых я удалял маленький скрытый раздел, оставлял раздел с папкой Windows. Делал этот раздел активным и копировал файлы загрузки. Тут вариантов восстановления много…С UEFI загрузчиком все сложнее. Там другая структура разделов и загрузочная запись находится в ПЗУ на системной плате. Загрузочная запись ищет загрузочный раздел с файловой системой fat32 и на этом разделе ищет загрузочные файлы с расширением .efi. И так далее…
Об этом я пишу в соответствующей теме далее Восстановление UEFI запуска Windows 8/8.1/10:
В этой статье мы разберемся, как восстановить загрузчик Windows 10 или Windows 8.1 на компьютере, работающем в режиме UEFI. Повреждение загрузчика Windows 8 может быть вызвано установкой второй ОС (Dual Boot — конфигурациях), некорректными действиями «специалиста» при восстановлении системы после сбоя, удалением “лишних” данных на скрытых разделах, вирусом-вымогателем и рядом других причин.
В этой статье мы опишем, как восстановить поврежденный или удаленный загрузчик ОС в Windows 10 и Windows 8.1/8 на системах с EFI, которая должна помочь в том случае, если система не загружается из-за отсутствия или повреждения файла с конфигурацией загрузки EFIMicrosoftBootBCD. Инструкция по восстановлению загрузчика на Windows 7 несколько отличается – см статью Восстановление удаленных разделов EFI и загрузчика в Windows 7.
Содержание:
 Как установить Windows на GPT-диск, если компьютер не загружается с флешки UEFI
Ошибка загрузки The boot configuration data for your PC is missing: EFIMicrosoftBootBCD
О повреждении загрузчика Windows 10/8.1, установленной в режиме UEFI, может свидетельствовать невозможность загрузки системы и появление нового голубого «экрана смерти» с ошибкой:
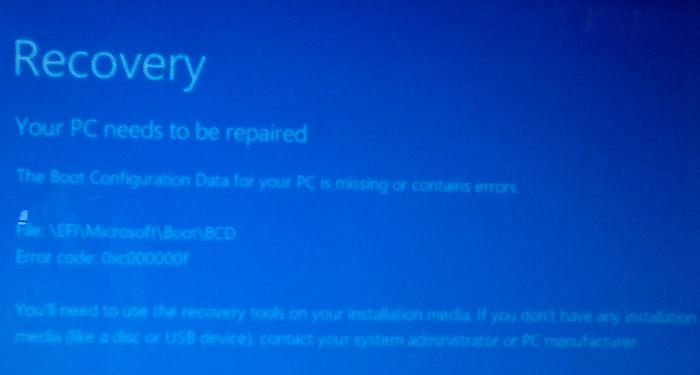
В русской версии Windows ошибка может быть такая:
Все это может свидетельствовать о повреждении или даже полном удалении конфигурации загрузчика Windows 8 — Boot Configuration Data (BCD) . Восстановить загрузчик BCD одним из рассмотренных ранее способов (1, 2) не получится: при попытке выполнить команду bcdedit система выдает ошибку:
Дело в том, что конфигурация загрузчика BCD BCD в Windows 10 / 8, установленной в режиме UEFI, хранится на отдельном скрытом разделеEFI (размером 100 мб с файловой системой FAT32), который утилита bcdedit не видит, и соответственно не может управлять конфигурацией загрузчика на нем.
Автоматическое восстановление загрузчика Windows
Процедура автоматического восстановления загрузчика, зашитая в среду восстановления Windows (WinRe), как правило в таких случаях бессильна. Но попробовать все-же стоит:
- Попробуйте загрузиться с диска восстановления / загрузочного диска Windows 10
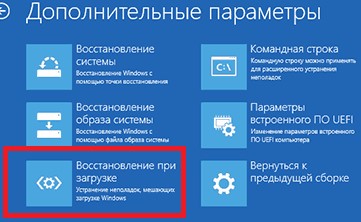
- На экране установки нажмите кнопку Восстановление системы
- Затем выберите пункт Поиск и устранение неисправностей -> Восстановление при загрузке и выберите ОС, загрузчик которой нужно попытаться восстановить.

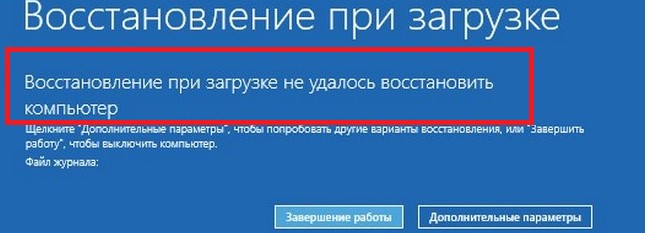
- Но скорее всего результат будет отрицательный: Восстановление при загрузке не удалось восстановить компьютер

Ручное восстановление загрузчика Windows с помощью загрузочного диска
Перейдем к процедуре рунного восстановления загрузчика Windows на системе с EFI.
Итак, чтобы восстановить конфигурацию загрузчика (BCD), необходимо загрузится с оригинального установочного DVD диска с Windows 8 (или диска восстановления или специально подготовленной загрузочной флешки) и открыть окно командной строки: выбрав Восстановление системы -> Диагностика -> Командная строка (System Restore — > Troubleshoot->Command Prompt), или нажав комбинацию клавиш Shift+F10). 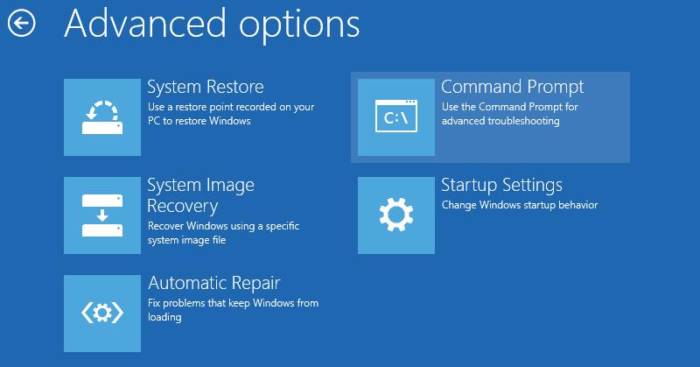
Запустим diskpart:
diskpart
Выведем список дисков в системе:
list disk
Выберем диск, на котором установлена ваша Windows (если жесткий диск в системе один, его индекс должен быть равен 0):
sel disk 0
Выведем список разделов в системе:
list vol
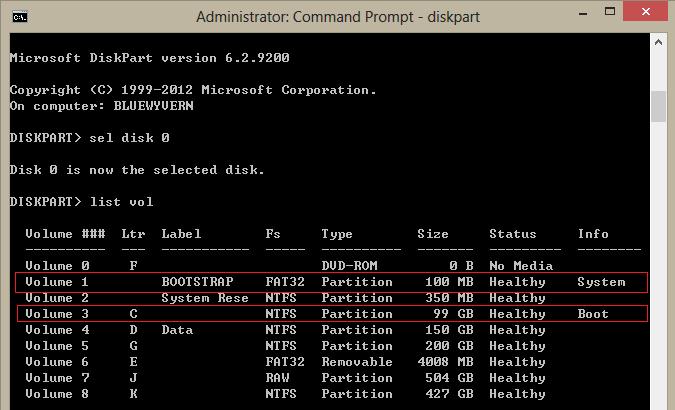 В нашем примере видно, что раздел EFI (его можно определить по размеру 100 Мб и файловой системе FAT32) имеет индекс volume 1, а загрузочный раздел с установленной системой Windows (это может быть как Windows 10 так и Windows 8.1/8) — volume 3.
Назначим скрытому EFI разделу произвольную букву диска:
select volume 1
assign letter M:
Должна появится строка, свидетельствующая об успешном назначении буквы диска разделу EFI:
DiskPart successfully assigned the drive letter or mount point.
Завершаем работу с diskpart:
exit
Перейдем в каталог с загрузчиком на скрытом разделе
cd /d m:efimicrosoftboot
В данном случае m: это буква диска, присвоенная разделу UEFI чуть выше. Если каталог EFIMicrosoftBoot отсуствует (ошибка The system cannot find the path specified), попробуйте следующие команды:
cd /d M:Boot
или
cd /d M:ESDWindowsEFIMicrosoftBoot
Пересоздадим загрузочный сектор на загрузочном разделе:
bootrec /fixboot
С помощью команды attrib снимите атрибуты скрытый, read-only и системный с файла BCD:
attrib BCD -s -h -r
Удалим текущий файл с конфигурацией BCD, переименовав его (сохранив старую конфигурацию в качестве резервной копии):
ren BCD BCD.bak
С помощью утилиты bcdboot.exe пересоздадим хранилище BCD, скопировав файлы среды загрузки из системного каталога:bcdboot C:Windows /l en-us /s M: /f ALLгде, C:Windows – путь к каталогу с установленной Windows 8./f ALL – означает что необходимо скопировать файлы среды загрузки, включая файлы для компьютеров с UEFI или BIOS (теоретическая возможность загружаться на EFI и BIOS системах)/l en-us — тип системной локали . По умолчанию используется en-us — английский язык (США) .
Совет. В случае использования локализованной русской версии Windows 10 / Windows 8 команда будет другая:bcdboot C:Windows /L ru-ru /S M: /F ALL
Возможные ошибки:
- BFSVC Error : Can not open the BCD template store. status – [c000000f] – проверьте правильность введенной команды и используется ли у вас локализованная Windows, в этом случае нужно правильно указать код языка системы (local language code)
- BFSVC Error: Error copying boot files Last Error = 0x570 – попробуйте выполнить проверку диска с помощью команды CHKDSK M: /F
Выполните команды:
bootrec /scanosbootrec /rebuildbcd
Осталось перезагрузить компьютер, после чего в выборе устройств загрузки должен появиться пункт Windows Boot Manager в котором можно выбрать загрузку нужной ОС. Конфигурация загрузчика BCD успешно восстановлена!
—>
BCDBoot is a command-line tool used to configure the boot files on a PC or device to run the Windows operating system. You can use the tool in the following scenarios:
- Add boot files to a PC after applying a new Windows image. In a typical image-based Windows deployment, use BCDBoot to set up the firmware and system partition to boot to your image. To learn more, see Capture and Apply Windows, System, and Recovery Partitions.
- Set up the PC to boot to a virtual hard disk (VHD) file that includes a Windows image. To learn more, see Boot to VHD (Native Boot): Add a Virtual Hard Disk to the Boot Menu.
- Repair the system partition. If the system partition has been corrupted, you can use BCDBoot to recreate the system partition files by using new copies of these files from the Windows partition.
- Set up or repair the boot menu on a dual-boot PC. If you’ve installed more than one copy of Windows on a PC, you can use BCDBoot to add or repair the boot menu.
|
In Windows and Windows Preinstallation Environment (WinPE) |
%WINDIR%System32BCDBoot.exe |
|
In the Windows Assessment and Deployment Kit (Windows ADK): |
C:Program Files (x86)Windows Kits10Assessment and Deployment KitDeployment Toolsamd64BCDBootBCDBoot.exe |
BCDBoot can copy boot environment files from images of Windows 10, Windows 8.1, Windows 8, Windows 7, Windows Vista, Windows Server 2016 Technical Preview, Windows Server 2012 R2, Windows Server 2012, Windows Server 2008 R2, or Windows Server 2008.
To configure the system partition, BCDBoot copies a small set of boot-environment files from the installed Windows image to the system partition.
BCDBoot can create a Boot Configuration Data (BCD) store on the system partition using the latest version of the Windows files:
- BCDBoot creates a new BCD store and initialize the BCD boot-environment files on the system partition, including the Windows Boot Manager, using the %WINDIR%System32ConfigBCD-Template file.
- New in Windows 10: During an upgrade, BCDBoot preserves any other existing boot entries, such as debugsettings, when creating the new store. Use the /c option to ignore the old settings and start fresh with a new BCD store.
- If there is already a boot entry for this Windows partition, by default, BCDBoot erases the old boot entry and its values. Use the /m option to retain the values from an existing boot entry when you update the system files.
- By default, BCDBoot moves the boot entry for the selected Windows partition to the top of the Windows Boot Manager boot order. Use the /d option to preserve the existing boot order.
On UEFI PCs, BCDBoot can update the firmware entries in the device’s NVRAM:
- BCDBoot adds a firmware entry in the NVRAM to point to the Windows Boot Manager. By default, this entry is placed as the first item in the boot list. Use the /p option to preserve the existing UEFI boot order. Use /addlast to add it to the bottom of the boot order list.
The following command-line options are available for BCDBoot.exe.
BCDBOOT<source> [/l<locale>] [/s<volume-letter> [/f<firmware type>]] [/v] [/m [{OS Loader GUID}]] [/addlast or /p] [/d] [/c]
| Option | Description |
|---|---|
|
Required. Specifies the location of the Windows directory to use as the source for copying boot-environment files. The following example initializes the system partition by using BCD files from the C:Windows folder: |
|
|
Optional. Specifies the locale. The default is US English ( The following example sets the default BCD locale to Japanese: |
|
|
Optional. Specifies the volume letter of the system partition. This option should not be used in typical deployment scenarios. Use this setting to specify a system partition when you are configuring a drive that will be booted on another computer, such as a USB flash drive or a secondary hard drive. UEFI:
BIOS:
The following example copies BCD files from the C:Windows folder to a system partition on a secondary hard drive that will be booted on another computer. The system partition on the secondary drive was assigned the volume letter S: The following example creates boot entries on a USB flash drive with the volume letter S, including boot files to support either a UEFI-based or a BIOS-based computer: |
|
|
Optional. Specifies the firmware type. Valid values include
If you specify the /f option, you must also specify the /s option to identify the volume letter of the system partition. The following example copies BCD files that support booting on either a UEFI-based or a BIOS-based computer from the C:Windows folder to a USB flash drive that was assigned the volume letter S: |
|
|
/v |
Optional. Enables verbose mode. Example: |
|
/m [{OS Loader GUID}] |
Optional. Merges the values from an existing boot entry into a new boot entry. By default, this option merges only global objects. If you specify an OS Loader GUID, this option merges the loader object in the system template to produce a bootable entry. The following example merges the operating-system loader in the current BCD store that the specified GUID identifies in the new BCD store: |
|
/addlast |
Optional. Specifies that the Windows Boot Manager firmware entry should be added last. The default behavior is to add it first. Cannot be used with /p. |
|
/p |
Optional. Specifies that the existing Windows Boot Manager firmware entry position should be preserved in the UEFI boot order. If entry does not exist, a new entry is added in the first position. Cannot be used with /addlast. By default, during an upgrade BCDBoot moves the Windows Boot Manager to be the first entry in the UEFI boot order. |
|
/d |
Optional. Preserves the existing default operating system entry in the {bootmgr} object in Windows Boot Manager. |
|
/c |
Optional. Specifies that any existing BCD elements should not be migrated. New for Windows 10: By default, during an upgrade, BCD elements such as debugsettings or flightsigning are preserved. |
If the system partition has been corrupted, you can use BCDBoot to recreate the system partition files by using new copies of these files from the Windows partition.
-
Boot your PC to a command line. For example, boot to the Windows installation disk and press Shift+F10, or boot to Windows PE (WinPE: Create USB Bootable drive).
-
Use Diskpart to determine which drive letter contains your Windows partition and system partition (
diskpart, list vol, exit). -
Optional: Format your system partition:
format (drive letter of your system partition) /q -
Add a boot entry for your Windows partition:
bcdboot D:Windows -
Reboot the PC. Windows should appear.
When setting up a PC to boot more than one operating system, you may sometimes lose the ability to boot into one of the operating systems. The BCDBoot option allows you to quickly add boot options for a Windows-based operating system. To set up a dual-boot PC:
-
Install a separate hard drive or prepare a separate partition for each operating system.
-
Install the operating systems. For example, if your PC has Windows 7, install Windows 10 onto the other hard drive or partition.
-
Reboot the PC. The boot menus should appear with both operating systems listed.
If both operating systems aren’t listed:
-
Open a command line, either as an administrator from inside Windows, or by booting to a command line using the Windows installation media and pressing Shift+F10, or by booting to Windows PE (WinPE: Create USB Bootable drive).
-
Add boot options for a Windows operating system.
bcdboot D:Windows -
Reboot the PC. Now, the boot menu will show both menu options.
-
For information about repairing the boot files on a PC with Windows XP and a more recent version of Windows such as Windows 7, see the Microsoft Knowledge Base Article 2277998.
Capture and Apply Windows, System, and Recovery Partitions
Configure BIOS/MBR-Based Hard Drive Partitions
Configure UEFI/GPT-Based Hard Drive Partitions
BCDedit
Bootsect Command-Line Options
Diskpart Command line syntax
—>Используемые источники:
- https://novoselovvlad.ru/2017/12/31/%d0%b2%d0%be%d1%81%d1%81%d1%82%d0%b0%d0%bd%d0%be%d0%b2%d0%bb%d0%b5%d0%bd%d0%b8%d0%b5-mbr-%d0%b7%d0%b0%d0%b3%d1%80%d1%83%d0%b7%d1%87%d0%b8%d0%ba%d0%b0-windows-vista-7-8-8-1-10-%d1%87%d0%b0%d1%81%d1%82/
- https://winitpro.ru/index.php/2014/03/20/repair-bootloader-windows-8-uefi/
- https://docs.microsoft.com/en-us/windows-hardware/manufacture/desktop/bcdboot-command-line-options-techref-di
 В чём разница между GPT и MBR при создании разделов на диске?
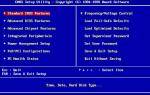 "Установка Windows на данный диск невозможна. На выбранном диске находится таблица MBR"
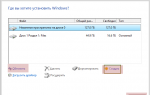 Ошибка «На выбранном диске находится таблица mbr-разделов установка невозможна» во время установки Windows
 Как в БИОСе правильно поставить загрузку с флешки